DIY Tutorial: Colorful Tissue Fringe Garland

I’m excited to share a colorful, easy, and super budget-friendly party DIY with you today!
I used these Tissue Fringe Garlands in a Fiesta-themed project recently, but they’re versatile enough to work for all kinds of celebrations.
And as simple as they seem, though, there are a couple of tricks to making them work well. For example, you’ll need to fold the tissue paper in a very specific way, or else the panels can randomly fall apart on the twine. 😬 And neither of us want THAT, of course! 😉 Full details below…

Fiesta Fun Party Printables
Planning a fiesta themed birthday party? Check out my Fiesta Fun printables. They make it so EASY to add pro designer style & personalization to your event. It’s like branding for your party! 🙌 Click here to shop now. (also available in a baby shower version)
COLORFUL TISSUE FRINGE GARLAND
***
You’ll Need:
- Tissue Paper (1 sheet makes 2 garland panels)
- Scissors
- Tape
- Binder Clip
- Twine (or other string)
Steps:
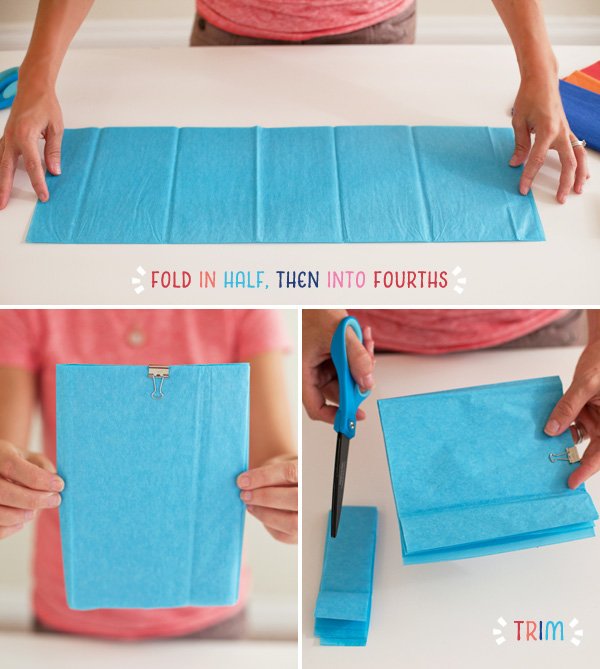
1. Start with one sheet of tissue paper, folded in half lengthwise so you have a very long rectangle – then fold the rectangle into fourths. (Just ignore the existing creases in the paper when creating the new folds.) Secure the fold with a binder clip.

2. Trim about 1.5 inches off the bottom of the folded rectangle. This step is optional – I just like the look of my garland panels to be a little “boxier”!
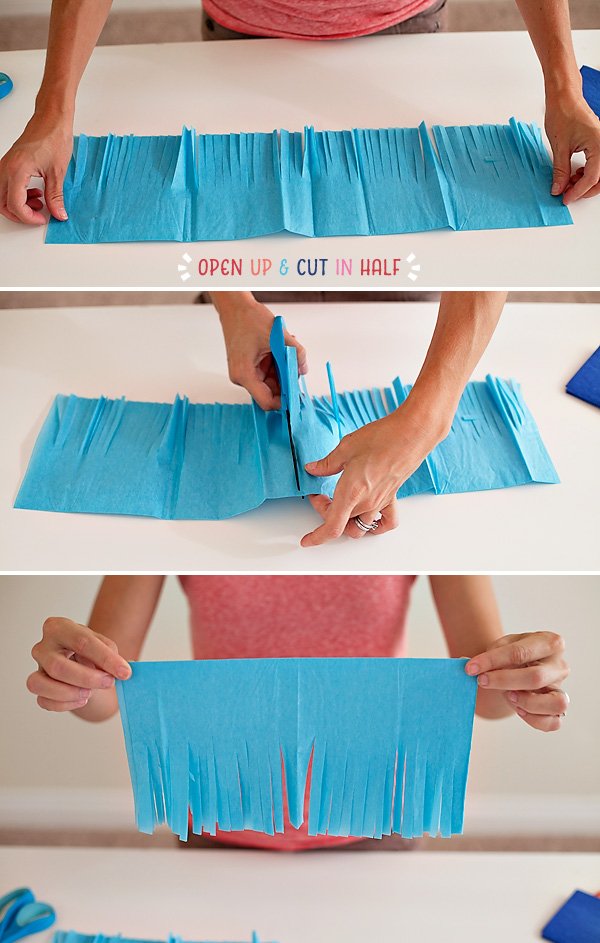
3. Use scissors to fringe the tissue paper, starting from the bottom and cutting a little more than halfway up.

4. Remove the binder clip and lay the tissue paper out flat, then cut it in half. You now have 2 separate garland pieces.

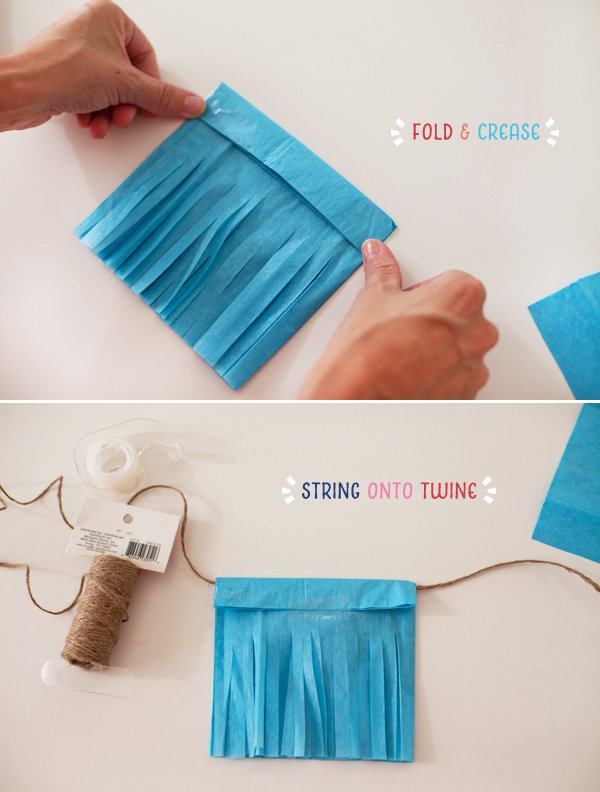
5. Fold each fringe panel in half, and secure the open sides with tape.

6. To make “stringing” the panels easier, fold & crease them at the top first, then lay the twine (or string) down inside the crease, and secure it with tape.

The tape should not touch the twine at all – this way you can slide and adjust the garland panels as necessary.

And you’re done! Repeat the process to make more fringe panels, and be sure to mix up the colors for an extra festive look.
(P.S. We took the below shot after this garland had been stored for a couple of weeks and brought back out, so please excuse the extra creases in it!)

Happy Celebrating!

Fiesta Fun Party Printables
Planning a fiesta themed birthday party? Check out my Fiesta Fun printables! They make it so EASY to add pro designer style and personalization to your event. It’s like branding for your party! 🙌Click here to shop now. (also available in a baby shower version)
8 Comments
Comments are closed.


Itching for a #DIY wedding project? Add some color with a tissue fringe garland! #wedding http://t.co/rgsuS0MCpA
great easy way of decorating
thanks alot easy decorration
thanks alot easy decorration
thanks alot easy decorration