DIY Tutorial: Rustic-Chic Placemat Stencil

As I’m sure many of you know, planning a party can often be hectic and/or expensive, so when it comes to simple & affordable hacks that don’t skimp on classiness, I’m all in!! And I’ve also got the perfect example to share with you today… Elizabeth from Bump Smitten sent over this ingenious trick for dressing up your tablescapes, complete with step-by-step photos & instructions + downloads of the templates! This is such a versatile look… perfect for adding a touch of rustic flair to so many types of themes & materials. Read on for all the clever details. (Thanks again, Elizabeth!)

PLACEMAT STENCIL – DIY TUTORIAL
by Bump Smitten
I see a lot of craft paper popping up in many different types of parties. Its cheap and very rustic/chic. I used the same idea as chalk on black chalkboard paint, but with white paint pens on brown craft paper. It’s cost effective and a fun alternative to fabric place mats. Bonus Tip: You could also use the white pens to write the names of your guests!
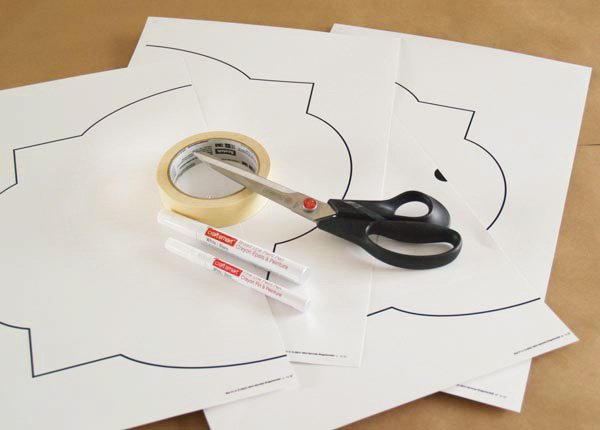
Here’s what you’ll need:
- Craft Paper
- Printed Placemat Templates (download for free here & here)
- 11×17 Thick Paper
- Thick White Paint Pen
- Thin White Paint Pen
- Tape
- Scissors
Instructions:
1. Cover your table with craft paper (make sure it overlaps down the center of the table). Print up both templates on 11×17 paper (either at your local print shop or home printer). Each template has 2 pages, 4 total.
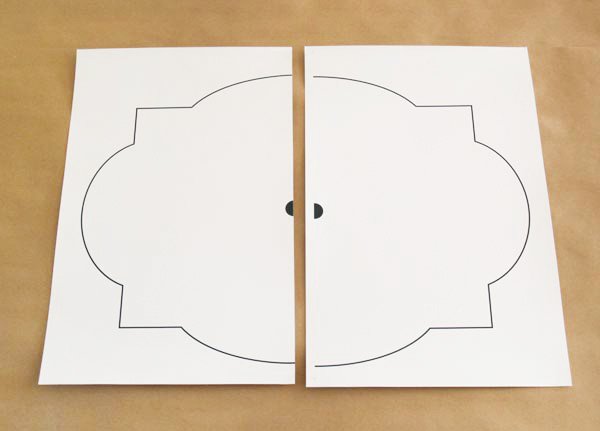
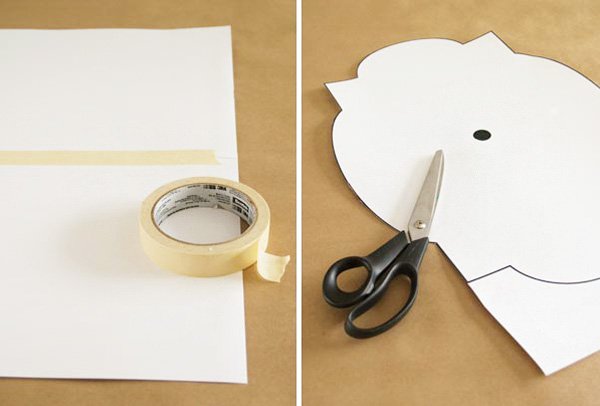
2. Tape both sheets from the large and small template pdf together. Line them up in the middle — there should be a small overlap. In the end, you will have 2 place mats, a large one and slightly smaller one. Cut out each template along the black lines.
3. Place the large placemat stencil on the craft paper where you want the plate to sit. Outline this template with the larger white paint pen. Once you’re done, go back along the line 2-3 times until its a thicker white line.

4. Center the smaller template inside the larger one. Outline this template with the thin white paint pen. Once you’re done, retrace the line 2-3 times until it is a darker white line.

5. Once you’ve completed one placemat outline, repeat the rest until done. I found it easier to use a tape measure to position each setting.

6. Center your plates inside the outline. Decorate the table with napkins, silverware, candles and flowers.

11 Comments
Comments are closed.


The possibilities are endless with this one! http://t.co/VtOuxmEtu4
Interesting idea, i like it!
Filing this one away for my next wine dinner DIY Tutorial: Rustic-Chic Placemat Stencil https://www.hwtm.com/2014/07/diy-tutorial-chalk-placemat-stencil/
Im going to have so much fun with this one, thank you!
This DIY stencil table runner is perfect for bridal showers – easy to make and easy to customize https://www.hwtm.com/2014/07/diy-tutorial-chalk-placemat-stencil/
Such a great idea!
Wonderful idea will try it for some birthday for sure :)
I could try with gift wrap and black marker for hollydays :)
Hello everyone,
Thanks to Bump Smitten for the perfect tutorial. Excellent idea, well done! It is pleasure for me to know that so creative people exist.
Hey, this is a great idea! I already try it and everyone was truly surprised on my birthday party!